

For a recent project i needed to run a script to get information from SharePoint.
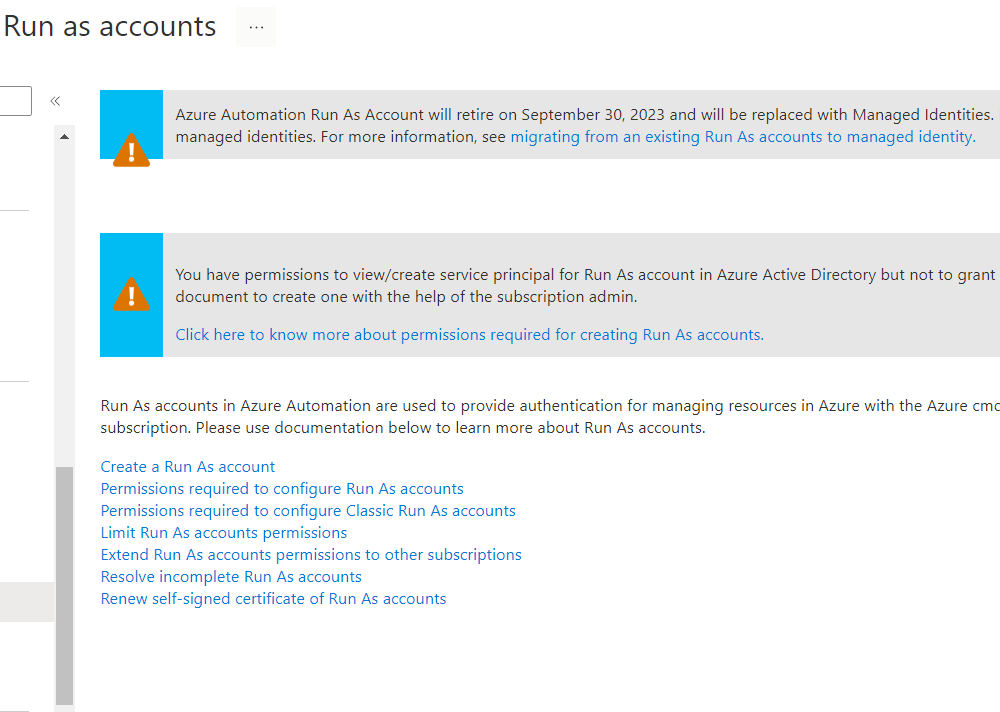
When i started to setup the Automation account i got warned that Run As Accounts are deprecated soon.
So it seems we need to move forward using Managed Identities from now on. For more explanation on Managed Identities i strongly advise you the see this video https://youtu.be/1EoiGnQq14Y
The setup procedure is rather simple once you know what to do 🙂
First check if Managed Identity is turned on in your Automation account. The steps to create an Automation Account are not described here but can be found here for example : Use Azure Automation and PowerShell to Automate Office 365 Tasks — LazyAdmin
Stop following the steps for creating an Automation account from the point that he is writing about authentication and run as accounts, this is old news and will not help you in the near future anymore.
In the Automation Account click on “Identity” to see if System Assigned Managed Identity is switched on. If the status is set to off then switch it on here and copy the object (principal) id somewhere close since you are going to need that later on.

Now open up a local powershell window and connect to Azure AD using the command : Connect-AzureAD
If the command fails install the module using command : Install-Module AzureAD and answer al questions with yes.
Now run the command written below to set the correct permissions (You need to add your Principal ID from earlier on the second line yourself) :
# Object Id of the managed identity
$ObjIdDev =  "Copy the Object (Principal) ID you got from the Automation Account Here"

$PermissionMap = @{
    '00000003-0000-0000-c000-000000000000' = @( # Microsoft Graph
        'User.Read.All'
        'Group.Read.All'
        'Group.ReadWrite.All'
        'Sites.Read.All'
        'Sites.ReadWrite.All'
    )
    '00000003-0000-0ff1-ce00-000000000000' = @( # Office 365 SharePoint Online
        'Sites.FullControl.All'
    )
}

Connect-AzureAD

# Get Service Principal using ObjectId
$ManagedIdentity = Get-AzureADServicePrincipal -ObjectId $ObjIdDev

Get-AzureADServicePrincipal -All $true | Where-Object { $_.AppId -in $PermissionMap.Keys} -PipelineVariable SP | ForEach-Object {

    $SP.AppRoles | Where-Object { $_.Value -in $PermissionMap[$SP.AppId] -and $_.AllowedMemberTypes -contains "Application" } -PipelineVariable AppRole | ForEach-Object {
        try {
            New-AzureAdServiceAppRoleAssignment -ObjectId $ManagedIdentity.ObjectId `
                                            -PrincipalId $ManagedIdentity.ObjectId `
                                            -ResourceId $SP.ObjectId `
                                            -Id $_.Id `
                                            -ErrorAction Stop
        } catch [Microsoft.Open.AzureAD16.Client.ApiException] {
            if ($_.Exception.Message -like '*Permission being assigned already exists on the object*') {
                'Permission {0} already set on {1}.' -f $AppRole.Value, $SP.DisplayName | Write-Warning
            } else {
                throw $_.Exception
            }
        }
    }
}
If you want less permissions or maybe even more than you can see the available options using this few lines and you can add the roles to the code above.
$servicePrincipalSP = Get-AzADServicePrincipal -AppId "00000003-0000-0ff1-ce00-000000000000" # SharePoint Online
$servicePrincipalSP.AppRole | Where-Object { $_.AllowedMemberType -eq "Application" } | select value, Displayname
$servicePrincipalMG = Get-AzADServicePrincipal -AppId "00000003-0000-0000-c000-000000000000" # Microsoft Graph
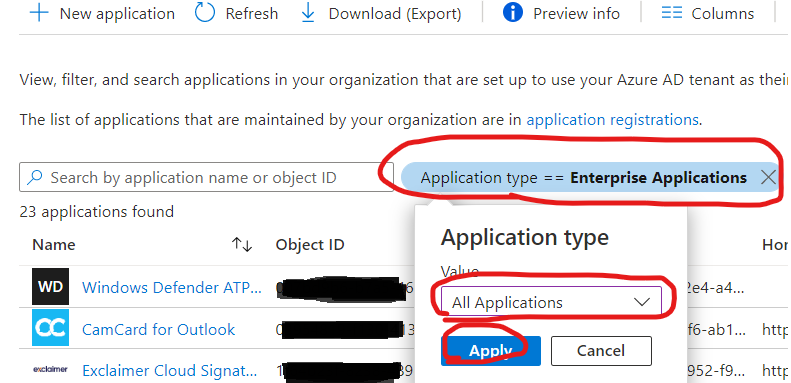
$servicePrincipalMG.AppRole | Where-Object { $_.AllowedMemberType -eq "Application" } | select value, DisplaynameYou can check the rights bij going to the Azure Portal and navigate to Azure Active Directory and then click on Enterprise Applications.
Click on the Application type and set the value to “All Applications” and click Apply.
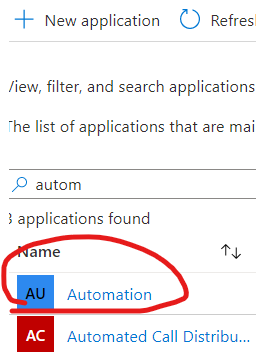
Search for an app that has the same name as your Automation Account. In my example that is Automation
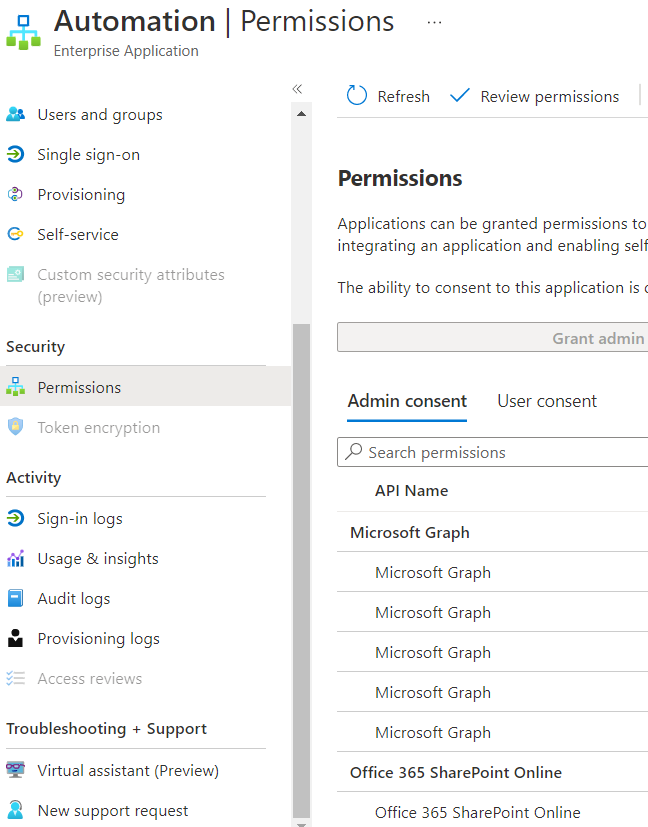
Click on your app and navigate to Permissions to see the permissions you have set in the previous steps.
Now create your Azure Runbook as you are used to and connect to Sharepoint using :
Connect-PnPOnline -ManagedIdentityYes, it really is that easy!!! Now you have a secure connection from your Azure Runbook to Sharepoint Online without having any credentials in your code.
I did run into problems connecting to a specific site and got a error message : The current connection holds no SharePoint context
Apparently you need to connect using a access token to be able to get arround the issue. More Info
$resourceURI ="https://<yourtenant>.sharepoint.com"
$siteUrl="https://<yourtenant>.sharepoint.com/sites/<yoursite>"
# Get token
$tokenAuthURI = $env:IDENTITY_ENDPOINT + "?resource=$resourceURI&api-version=2017-09-01"
$tokenResponse = Invoke-RestMethod -Method Get -Headers @{"Secret" = "$env:IDENTITY_HEADER" } -Uri $tokenAuthURI
$accessToken = $tokenResponse.access_token

# Authenticate to SPO site
Connect-PnPOnline -Url  $siteUrl -AccessToken $accessToken