For a recent client i have created a sharepoint list where they can add new users to the Microsoft Tenant. In the list they can set the license and also the sharepoint permissions, i wanted to extend that with the possibility to do this for the Exchange permissions as well but was supprised that this was simply not supported by Power Automate. Since we can add users to M365 Groups and also to security groups i have created a Azure Runbook that would run a powershell script to copy over the users and set the permissions on the mailbox.
To setup the Automation account and to configure the runbook you can follow the following procedure that i have copied over from Ruud : Use Azure Automation and PowerShell to Automate Office 365 Tasks — LazyAdmin
- Log in to the Azure Portal
Go to https://portal.azure.com/ and log in with your Office 365 credentials.
- Go to Automation accounts services
Use the search bar to find the automation accounts services

- Create a new automation account
Click on Create to create a new automation account.
– Give your automation account a name
– Select your subscription (free trial or pay-as-you-go)
– Create or select a resource group
It can take a couple of minutes until the resource group is created.

- Open your Azure Automation Account
Select your new automation account after it’s created.
- Install PowerShell modules
Before we can start creating our first runbook, we first need to install the necessary PowerShell modules.
Select modules and click on Browse Gallery
Install the following modules:
– PnP.PowerShell
– AzureAD
– ExchangeOnlineManagement

We have now created our Azure Automation account and can start with creating our first Runbook.
Authentication in Azure Runbook when using MFA
Authentication in Azure Runbooks is always a bit of a challenge. You could exclude the Azure services from MFA with conditional access rules, but that would require you to keep up-to-date with all the IP Addresses.
Another option would be to exclude the service account from MFA, but that is not a best practice. Service accounts maybe have global admin rights, so you want to protect those accounts properly.
So how do you authenticate to AzureAD or Exchange Online in an Azure Runbook? Well, we can use the Azure Run As account.
During the creation of our Azure Automation account we automatically also created a Run as account. The Run As account provides authentication for Azure Runbooks, Automation, and managing resources on the Azure Resource Manager using a self-signed certificate.
Note
The certificate is only valid for one year. You will need to make sure that you renew the certificate before it expires.
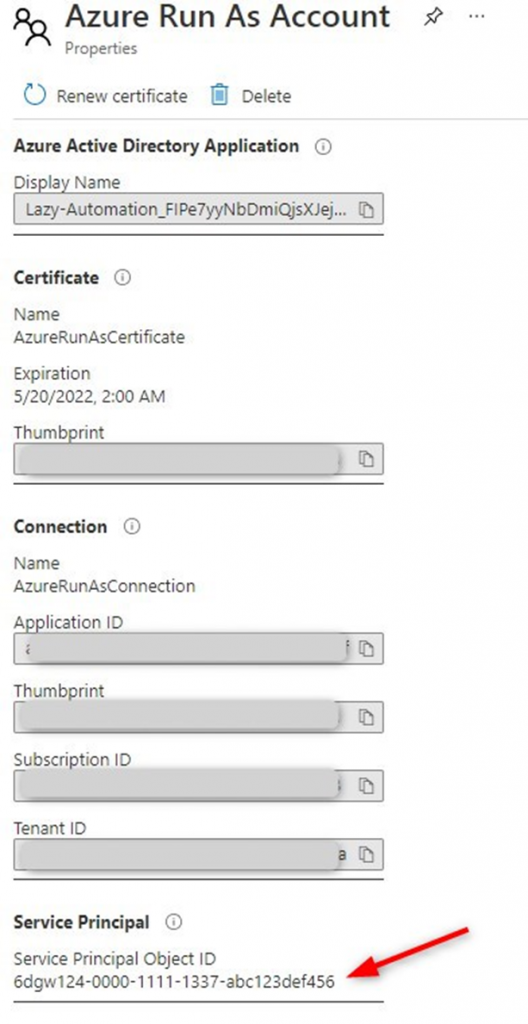
We are going to assign the Run As account the correct permissions to access AzureAD, Exchange Online, and SharePoint. To get started we first need to find the objectId of the account.
- Select Run as accounts in your Azure Automation Account.
- Note the Service Principal Object ID

We are going to add the correct permissions one by one. You can find the complete script here at LazyAdmins Github that will set all permissions in one run.
Connecting to AzureAD from an Azure Runbook
We will first grant our Service Principal account the correct permission to access AzureAD. Make sure you have the AzureAD module installed locally and open PowerShell.
First connect to Azure AD and replace the service principal object id with your own object id.
# Connect to Azure AD
Connect-AzureAD
# Get the Service Principal based on the object Id
$servicePrincipalObjectId = “6dgw124-0000-1111-1337-abc123def456”
If you only need to read data from the AzureAD, then you can give the service principal the Directory Reader role.
This part did not work for me. I think Microsoft changed the name of the role to “Global Reader” and to “Global Administrator”.
So please change the roles in the code below.
Add-AzureADDirectoryRoleMember -ObjectId (Get-AzureADDirectoryRole | where-object {$_.DisplayName -eq “Directory Reader”}).Objectid -RefObjectId $servicePrincipalObjectId
Another option is to make it Global Admin so it can fully manage your Active Directory:
Add-AzureADDirectoryRoleMember -ObjectId (Get-AzureADDirectoryRole | where-object {$_.DisplayName -eq “Company Administrator”}).Objectid -RefObjectId $servicePrincipalObjectId
You can list all available roles in your tenant with the following cmd
Get-AzureADDirectoryRole
You can now connect to AzureAD with the following code in your PowerShell Runbooks.
In my case this code did not work. I paste the code that worked for me under this one.
# Get the service principal connection details
$spConnection = Get-AutomationConnection -Name AzureRunAsConnection
# Connect AzureAd
Connect-AzureAD -TenantId $spConnection.TenantId -ApplicationId $spConnection.ApplicationID -CertificateThumbprint $spConnection.CertificateThumbprint | No-Output
# Test connection:
“User count:”
(Get-AzureADUser).count
Working code for me :
#Connect to Azure AD
“Logging in to Azure AD…”
Connect-AzureAD –TenantId $spConnection.TenantId –ApplicationId $spConnection.ApplicationId
–CertificateThumbprint $spConnection.CertificateThumbprint
Connect to Exchange Online from an Azure Runbook
There is an extra step needed to grant the service principal account access to Exchange Online. We have to give it the Exchange Administrator role and the appropriate API permissions.
# Connect to Azure AD
Connect-AzureAD
# Get the Service Principal based on the object Id
$servicePrincipalObjectId = “6dgw124-0000-1111-1337-abc123def456”
# Assign the Exchange Administrator Role
Add-AzureADDirectoryRoleMember -ObjectId (Get-AzureADDirectoryRole | where-object {$_.DisplayName -eq “Exchange Administrator”}).Objectid -RefObjectId $servicePrincipalObjectId
If you don’t have the Exchange Administrator role in your tenant, then you can enable it with the following code:
if (Get-AzureADDirectoryRole | where-object {$_.DisplayName -eq “Exchange Administrator”} -eq $null) {
Enable-AzureADDirectoryRole -RoleTemplateId (Get-AzureADDirectoryRoleTemplate | Where-Object {$_.DisplayName -eq “Exchange Administrator”}).Objectid
}
For the Exchange Online API permissions we can use the following code:
# Get the Office 365 Exchange Online App
$EXOApp = (Get-AzureADServicePrincipal -Filter “AppID eq ‘00000002-0000-0ff1-ce00-000000000000′”)
$servicePrincipal = Get-AzureADServicePrincipal -ObjectId $servicePrincipalObjectId
# Get the roles
$permission = $EXOApp.AppRoles | Where-Object { $_.Value -eq ‘Exchange.ManageAsApp’ }
# Create the permission object
$apiPermission = [Microsoft.Open.AzureAD.Model.RequiredResourceAccess]@{
ResourceAppId = $EXOApp.AppId ;
ResourceAccess = [Microsoft.Open.AzureAD.Model.ResourceAccess]@{
Id = $permission.Id ;
Type = “Role”
}
}
$Application = Get-AzureADApplication | Where-Object {$_.AppId -eq $servicePrincipal.AppId}
$Application | Set-AzureADApplication -ReplyUrls ‘http://localhost’
$Application | Set-AzureADApplication -RequiredResourceAccess $apiPermission
All you need to do now is grant admin consent for the permissions that we have assigned.
- Open your Azure Active Directory
- Choose App registrations
- Click on All applications and select your Automation account
- Go to API Permissions
- Click Grant admin consent

You can now connect to Exchange Online in your Azure Runbook with the following PowerShell code:
# Get the service principal connection details
$spConnection = Get-AutomationConnection -Name AzureRunAsConnection
# Set your tenant name
$tenantName = “contoso.onmicrosoft.com”
# Connect to ExchangeOnline
Connect-ExchangeOnline -CertificateThumbprint $spConnection.CertificateThumbprint -AppId $spConnection.ApplicationID -Organization $tenantName
# Test connection
(Get-ExoMailbox).count
The content of the runbook is as followed :
Fill in the Tenantname of your tenant.
Fill in the Object ID of the group after the $M365 =
Fill in the Mailbox name after $mailbox =
In this example the users will be granted the Full Access and Send Ass Permissions on the mailbox. In this example the users come from a security group.
# Get the service principal connection details
$spConnection = Get-AutomationConnection -Name AzureRunAsConnection
# Set your tenant name
$tenantName = “tenantname.onmicrosoft.com”
# Connect AzureAd
“Logging in to Azure AD…”
Connect-AzureAD –TenantId $spConnection.TenantId `
–ApplicationId $spConnection.ApplicationId `
–CertificateThumbprint $spConnection.CertificateThumbprint
# Connect to ExchangeOnline
Connect-ExchangeOnline -CertificateThumbprint $spConnection.CertificateThumbprint -AppId $spConnection.ApplicationID -Organization $tenantName
# Copy Users from “securitygroupname” group to Mailbox name
$M365 = “5djf396-de81-4f5e-b0bd-4856ddhf3”
$mailbox = “mailboxname”
$members = Get-azureadgroupmember -ObjectId $M365 -All $true | Select UserPrincipalName
$members | ForEach { Add-MailboxPermission -Identity $mailbox -User $_.UserPrincipalName -AccessRights FullAccess -Confirm:$false}
$members | ForEach { Add-RecipientPermission $mailbox -AccessRights sendas -Trustee $_.UserPrincipalName -Confirm:$false }
# Disconnect Exchange Online
Disconnect-ExchangeOnline -Confirm:$false
# Disconnect AzureAD
Disconnect-AzureAD -Confirm:$false
This example is for a Microsoft 365 Group.
# Get the service principal connection details
$spConnection = Get-AutomationConnection -Name AzureRunAsConnection
# Set your tenant name
$tenantName = “tenantname.onmicrosoft.com”
# Connect AzureAd
“Logging in to Azure AD…”
Connect-AzureAD –TenantId $spConnection.TenantId `
–ApplicationId $spConnection.ApplicationId `
–CertificateThumbprint $spConnection.CertificateThumbprint
# Connect to ExchangeOnline
Connect-ExchangeOnline -CertificateThumbprint $spConnection.CertificateThumbprint -AppId $spConnection.ApplicationID -Organization $tenantName
# Copy Users from “securitygroupname” group to Mailbox name
$M365 = “5djf396-de81-4f5e-b0bd-4856ddhf3”
$mailbox = “mailboxname”
$members = Get-UnifiedGroup -Identity $M365 | Get-UnifiedGroupLinks -LinkType Members -ResultSize Unlimited | select PrimarySmtpAddress
$members | ForEach { Add-MailboxPermission -Identity $koerhuis -User $_.PrimarySmtpAddress -AccessRights FullAccess -Confirm:$false}
$members | ForEach { Add-RecipientPermission $mailbox -AccessRights sendas -Trustee $_.PrimarySmtpAddress -Confirm:$false }
# Disconnect Exchange Online
Disconnect-ExchangeOnline -Confirm:$false
# Disconnect AzureAD
Disconnect-AzureAD -Confirm:$false


